Every designer must have a great graphics library. A well-stocked library of images, icons, tears, textures, and objects will help out when trying to make deadline, or even when you’re lacking inspiration. These elements can help pull together a final composition that would otherwise be lacking that “certain something”.
While in college I discovered this fact, but I also had very little money to build a decent graphics library. So I composed this collection of resources to use during times of little money, or none at all.
The content of your graphics library is open to interpretation and content should be compiled at your discretion, for your own needs. However, here are some general guidelines for how I organize my library. (Note: Within each main folder I separate vector and raster graphics into their own folders and then begin to organize by category within those folders.)
Here are the main folders within my library:
Objects
Paperclips, balloons, stickers, electronics, coffee cups, trees, airline tickets and other common objects can spruce up a design.
Brushes
Adobe Illustrator and Photoshop brushes come in handy when you need to create grungy textures (such as dirty up an image of clean paper), or when you need to create a beautiful starscape using a scattered brush.
Effects
Effects are great for cloning away unwanted objects in an image. You can stock up with things such as clouds, grass, and wood for just this purpose. Using shattered glass, rips and tears can also add depth to a composition.
Fonts
Although fonts aren’t graphics, it is good to have a quality stock of diverse fonts. Handwritten fonts can be used for catchy headers to add a sense of realism, or technical fonts can be used to back up a very mechanical layout.
Type
The Fonts folder is for electronic typefaces (True Type Fonts, Open Type, etc). In comparison, the Type folder is for images of lettering such as, wood or metal type, scrabble letters, and computer keys. These elements can add something unique to your design or layout.
Framing
Polaroid frames, distressed photos, torn posters, old books, post-it notes and gold frames make perfect frames for text, images, or layouts that really need to stand out.
Photos
Keeping stock photos that you’ve purchased previously is great to have on hand for a quick placeholder, background element, or to simply tweak with.
Textures
Keeping photos or scans of quality textures can add life to your work. Stock up on textures such as denim, wood, metal, rust, concrete, corkboard, paper, paint, water and brick.
___________________________________________________________________
Graphics Libraries take some time to build upon, but you can always find free resources online that can help you get started. I’ve compiled a large list of free resources that will help jumpstart your graphics library in no time. If you know of any more free resource sites or other sites that belong on this list please let me know and I would be happy to include them.
Free Resource Tips:
• You should always save the elements you create when designing other projects. You never know when you may be able to reuse them. They will come in handy!
• Most stock sites offer a freebie monthly. Sign up to download these free items and also to be part of their newsletter so you’ll remember to grab the freebie while you can. Such sites include VectorStock.com, iStockPhoto.com and Crestock.com, but there are many more.
• You can submit your work to most of these freebie sites to be distributed freely if you would like the publicity. Also, a lot of sites in the pay-site list you can actually make money by submitting your photos, vectors, etc.
• Most government organizations do not copyright their photos because they are not a commercial entity. For example, you can use photos from the NASA website with no worry of repercussions. There is a full list of governmental resources at Wikipedia (see link below).
Free Vector Sites:
vecteezy.com/ Large library of quality vectors.
gomedia.us This company puts out great sample packs.
vectorportal.com Simple vectors for download.
designerstoolbox.comdesignresources CD covers, folders and more templates.
freevectors.net Large selection.
vectorvault.com Register to access the “Free Downloads” section.
freevectors.com Small selection.
createsk8.com Browse blog posts for a lot of great freebies.
vectorart.org A small quantity of vectors, library is expected to grow.
vector4free.com Good selection of vectors.
free-vectors.com Large selection of simple vectors.
brandsoftheworld.com Vector logos from companies around the world.
logotemplater.com Great starter vectors for logo inspiration.
david.bellot.free.fr Deck of vector playing cards.
aiga.org Simple symbols.
all-the-flags-of-the-world.c.la Vector flags of the world.
Free Photo Sites:
sxc.hu Stock exchange site.
stockvault.net A large selection of amateur photos.
dreamstime.com You’ll need an account to access the free photos section.
imageafter.com A small selection of amateur photos.
commons.wikimedia.org/wiki/Main_Page Wikipedia has created what is called Wikimedia. It is a database of 2,695,602 freely usable media files to which anyone can contribute.
bigfoto.com A large selection of low quality images.
free-pictures-photos.com Free photos
Free Textures:
textureking.com A large database of quality textures.
freetextures.org
cgtextures.com
Free Fonts:
fontfreak Over 5,000 free fonts.
urbanfonts.com Excellent quality and large selection of free fonts.
dafont.com Excellent quality and large selection of free fonts.
bvfonts.com A small selection of unique fonts.
321fonts.com A large selection of fonts.
fontreactor.com A large selection of fonts.
fonts101.com A large selection of fonts.
logotypes.designer.am Free Logotypes.
Great sites containing mixture of different freebies:
bittbox.com/category/freebies Brushes, Fonts, Vectors, and much more.
browse.deviantart.com/resources Large selection of quality vectors, Photos, Tutorials, Textures, Fonts and a whole lot more. You have to have an account, which is free.
adobe.com/cfusion/exchange Adobe exchange. A great database of actions, filters, gradients, brushes and more.
brusheezy.com Free Photoshop brushes.
blog.spoongraphics.co.uk Vectors, Brushes, Tutorials and more.
wikipedia.org/wiki/Wikipedia:Public_domain_image_resources Here is an extensive list of Public Domain images, logos, music , stamps and more from Wikipedia.
Free Tutorials:
ndesign-studio.com Illustrator and Dreamweaver tutorials.
psdtuts.com Photoshop tutorials
pshero.com Photoshop tutorials
photoshoptalent.com/ Body enhancement Photoshop tutorials
aiburn.com Illustrator tutorials
smashingmagazine.com Photoshop, Illustrator, Dreamweaver and more.
3dtotal.com A great list of 100 Photoshop tutorials.
News and Inspiration:
adage.com
digg.com/design
designflavr.com
justcreativedesign.com
designfloat.com
smashingmagazine.com
If you are able to purchase I recommend:
crestock.com
shutterstock.com
istockphoto.com
vectorstock.com
gettyimages.com More expensive, but excellent images.
If any of these links do not work please report them to me and I will fix them immediately. Or if you have any other useful links to add to these please let me know. Thank you!
Note from the author: While I have been researching HDR imaging for a while now, if you have any additions or corrections please don’t hesitate to email me or comment. Even though it feels like I’ve soaked in an incredible amount of information, I know there is always more to learn.
HDR (High Dynamic Range Imaging)
HDR photography is the utilization of several techniques in order to display a greater dynamic range of exposure (the range of values between light and dark) than is capable with a normal digital image. The intention of HDR photography is to accurately represent the wide range of intensity levels found in real scenes ranging from direct sunlight to shadows. The resulting image more accurately mimics the incredible ability of the human eye to see wide ranges of dark and light areas in a single scene.
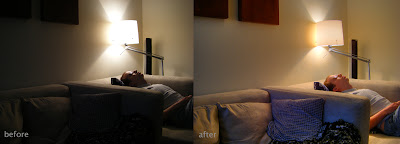
Here is the very first HDR I made with my little Fuji FinePix, proof that even the lowliest of cameras can benefit from this technique. The image on the left ("Before") is the image as would have been taken regularly. The image on the right ("After") is the HDR version of that image. Notice how you can see the detail within the lamp and in the foreground.
 |
___________________________________________________________________
Taking the Photo:
• Take pictures in RAW format.
• Set your ISO 400 or below to prevent noise.
• Use a sturdy tripod to prevent camera shake between pictures.
• Use a shutter-release cable or remote if you have one.
• Take at least 3 photos.
• Each exposure should be separated (bracketed) by one to two stops
• Only vary the shutter speed or exposure value (EV).
Exposure Bracketing Examples (using 7 photos):
Using varied EV: Take photos at -6EV, -4EV, -2EV, metered EV (master setting 0), +2EV, +4EV, and +6EV.
Using varied shutter speeds: Set your primary exposure (master setting 0). If the settings for picture 0 are (shutter speed) 1/125 and (f-stop) f/4.5, the settings for the remaining pictures are as follows:
• Picture +3: 1/250 f/4.5
• Picture +2: 1/200 f/4.5
• Picture +1: 1/160 f/4.5
• Picture 0: 1/125 f/4.5 (master setting 0)
• Picture -1: 1/100 f/4.5
• Picture -2: 1/80 f/4.5
• Picture -3: 1/60 f/4.5
Note: The darkest of these exposures should include no blown highlights in areas where you want to capture detail. The brightest exposure should show the darkest regions of the image with enough brightness that they are relatively noise-free and clearly visible.
Here is a sample of what a line-up of 3 exposures for potential use as an HDR should look like. Take a look at the lamp and the foreground. See the how the lightest picture brings out the detail in the foreground while the darkest picture brings out the detail in the lamp. HDR imaging combines these details into one high dynamic range photo.
 |
___________________________________________________________________
Initial Editing (optional):
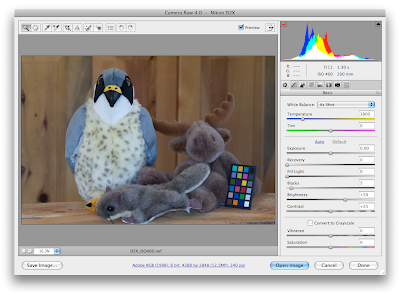
Select your range of exposed photos in Bridge (Adobe CS3) and drag all files to be used for the HDR image into the Photoshop icon in your dock (Mac). The Camera Raw box should appear. Using the dialog box:
• Make sure that all photos are the same color temperature and tint.
• Make sure that you turn off ALL the automatic check boxes.
• Adjust the color temperature to accurately portray real life temperature.
• Click “Done” and save.
Dialog box as seen in Photoshop CS3 on a Mac:
 |
___________________________________________________________________
Merging the Photos to an HDRi (High Dynamic Range Image):
Note: There are two options in this section. Choose one depending on your level of expertise, or mix and match to find the best option for your photo. You’ll find that your results can vary. One set of pictures might look best merged in Photoshop, while others might look best merged in Photomatix.
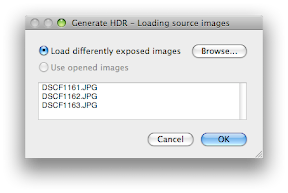
Using Photomatix to Merge:
• Choose: HDR> Generate.
• Choose your bracketed images.
• Click OK.
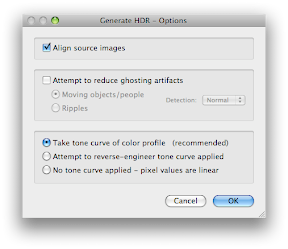
 |
• Do not check the "Align Input Images" unless you think the images are not aligned (camera was bumped etc).
• Click OK.
 |
• HDR image appears.
• Save as tiff if you are moving onto Photoshop to edit and tonemap, otherwise keep the HDR file open in Photomatix.
Using Photoshop to Merge:
• Open Photoshop: Choose File> Automate> Merge to HDR
• Choose your photos (3 or more)
• Do not check the "Align automatically" box unless you think the images are not aligned (camera was bumped etc).
• Click Ok.
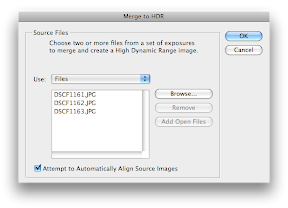 |
• Image appears, click ok.
• Save as tiff if you are moving onto Photomatix, otherwise keep the HDR file open in Photoshop.
___________________________________________________________________
Tone Mapping the HDRi:
Note: This section of the tutorial contains two options. Choose one depending on your level of expertise, or mix and match to find the best option for your photo. Your success can vary from program to program. Use programs for tone mapping at your discretion.
Use care when violating the image’s original tonal hierarchy; do not expect deep shadows to become nearly as light as a bright sky. In an outdoor arch, the sunlit building and sky are the brightest objects while the inside of the arch remains in shadow, and they should stay that way in a final image. Overdoing editing during HDR conversion easily can cause the image to lose its sense of realism.
Tone Mapping in Photomatix:
• Merge images into an HDR using one of the two methods explained above.
• Have your HDR image open in Photomatix.
• Choose HDR> Tone map
• Move sliders until you have the results you are looking for.
• Save as tiff
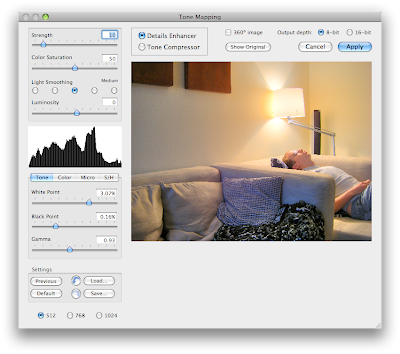 |
Note: You can make your photo look more or less illustrated at this point. Use your own judgment and style when it comes to this. If you find that Photomatix has left your photo with weird blackened and whitened areas, adjust the settings to lessen them then dodge and burn in Photoshop to fix these.
Tone Mapping in Photoshop:
• Open tiff
• Go to Image> Mode> 16 bits per channel.
• A box should appear, if you saved your tiff as 32 bit previously in Photomatix or Photoshop.
•Toggle Histogram arrow at bottom to show histogram.
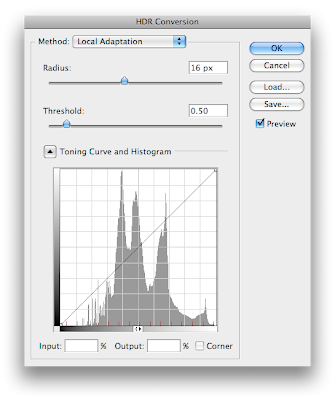 |
Work these menu items to your liking (HDR Conversion Menu):
Exposure and Gamma: This method lets you manually adjust the exposure and gamma, which serve as the equivalent to brightness and contrast adjustment, respectively.
Highlight Compression: This method has no options and applies a custom tonal curve, which greatly reduces highlight contrast in order to brighten and restore contrast in the rest of the image.
Equalize Histogram: This method attempts to redistribute the HDR histogram into the contrast range of a normal 16 or 8-bit image. This uses a custom tonal curve, which spreads out histogram peaks so that the histogram becomes more homogenous. It generally works best for image histograms, which have several relatively narrow peaks with no pixels in between.
Local Adaptation: Unlike the other three methods, this one changes how much it brightens or darkens regions on a per-pixel basis (similar to local contrast enhancement). This has the effect of tricking the eye into thinking that the image has more contrast, which is often critical in contrast-deprived HDR images. This method also allows changing the tonal curve to better suit the image. The main problem with the local adaptation method is that it cannot distinguish between incident and reflected light. As a result, it may unnecessarily darken naturally white textures and brighten darker ones. Be aware of this when choosing the radius and threshold settings so that this effect can be minimized.
Note: A good place to start your tone mapping is in the Local Adaptation menu. Go into menu at top and select "Local Adaptation". Move the black point slider to the leftmost edge of the histogram peaks in order to see all the shadow detail. Move the white point slider to the rightmost edge of the histogram peaks in order to see all highlight detail.
• Image> Adjustments (adjust settings, use your judgment)
• Tone, Filter and adjust to your liking.
• To remove unwanted objects, use healing brush.
• Stamp tool> Stamp out oversaturated pixels and halos, which happen often in HDR imaging.
• Make sure to save a tiff version to preserve quality.
_____________________________________________________________
HDR in Action:
During my career as a graphic designer at Better Homes I have introduced the photography team to HDR imaging. So far these are the results we have achieved. While our knowledge is still in it's infancy I feel that we are off to a really great start. Here are some images that were a team effort. The photography team took the exposures, and I tone mapped and edited the photos.
 |
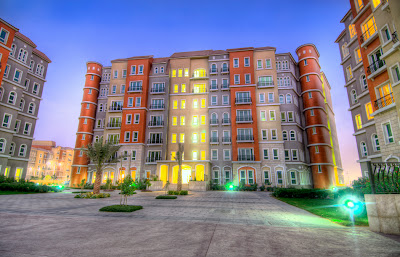 |
 |
Here are some very useful links for discovering more about HDR:
HDR Tutorials Roundup
Backing Winds: How to create professional HDR images
Before the Coffee: Bracketing and number of images
Cambridge in Color: Digital Photography Tutorials
How to take HDR Photos: Tips and Tricks
Lou Haskell: HDR Imaging
Memoirs on a Rainy Day: Modern HDR Photography
Earthbound Light: Photoshop HDR
Photoshop Cafe: HDR Tutorial
Cybergrain: The Future of Digital Imaging
Here are some great sites to look for HDR inspiration:
Smashing Magazine: 35 Fantastic HDR Pictures
Flicker: HDR Group
Cambridge HDR Photos
Before the Coffee
Digital Picture Zone: 25 Truly Stunning HDR Photos
Abduzeedo: 20 Beautiful HDR Pictures
Web Ecoist: 25 HDR Nature and Landscape photos
On May 19 I did something that scared the be-jesus out of me. I went on a 45 minute helicopter ride over Dubai.
Lately I’ve been getting to know the photography department at Better Homes, teaching them HDR imaging (or trying to at least, since I’m so new to it). The photography team booked a helicopter so that they could get some new photos of Dubai for the Better Homes Magazine and other media. So when the photography team had one more seat to fill on the helicopter ride, they thought of me! I was very hesitant to agree to this because honestly, I’m a big pussy-willow. I knew that I needed a push so I went to talk to Erik, knowing that he would not let my fears get the best of me and urge me to take the opportunity I had been given. So, after a few words I agreed to take aerial photos of Dubai.
When the day came I was ridiculously nervous. I was thinking... This is it. This is probably the last time I’m going to be alive (I know dramatic, right?). I arrived at the international airport with 3 photographers at 11am. They handed me my camera, locked and loaded. We were escorted by an airport employee to a small building on the side of the runway. Our pilot greeted us. He was an Aussie! I don’t know what it is about Australian accents, but I love them and they put me at ease!
So, I got in the helicopter strapped in and we began lifting off. What a feeling that was. I felt like a feather being lifted by an upward breeze. I loved it! I was no longer scared. It was unbelievably fun crawling along the runway 15 feet off the ground, preparing to officially take off. That may have been one of the coolest parts. It made me want to learn how to fly a helicopter so I could do it everyday. Imagine all the time saved during the morning commute... especially with Dubai traffic!
After getting into position, we lifted up high into the sky. The pictures pretty much tell the story from there.
 |
| Helicopter |
Don't forget... the Camel Goodness is Camelicious.
 |
| Apartment 1/28/08 8:55 PM |
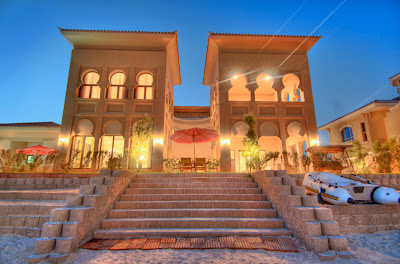
 |
| The Beach : Valentines Day 2/14/08 |
For the past month I have been dealing with "demon cat". My previous cat, Sheba, ended up being a major problem. I don't really know what it was, but she did not like living with Erik and me, so consequently we did not like living with her. Her unhappiness manifested in many different ways including obnoxious excessive meowing, defecation directly in FRONT of litter box every morning, refusal to be held, among many other things. I tried for weeks to change these habits and subsequently became pretty well versed on feline behavior and especially on litter boxes. I tried everything I could to make Sheba happy and she was still miserable. I became even more confused and upset when I found out that at her previous "foster home" she was fully litter trained and very affectionate. I decided the best thing to do was to return her to Feline Friends where she could find a new home and hope for a better life. I obviously couldn't give that to her.
On Saturday I returned to Feline Friends for the monthly "Open House" where Feline Friends brings all the homeless cats within their care together to have an open adoption day. My eyes teared up as I put Sheba's kennel on the table, beside all the other cats up for adoption. While I was waiting to speak to the adoption coordinator about the situation I had to turn around so I couldn't see her looking at me. She proceeded to hiss at the other cats surrounding her and when being put into a new kennel by a staff member, scratched and hissed at her as well. I felt somewhat better at that moment thinking I was justified in re-homing her, but somewhat worse. Was I the cause of her anger?
While I was trying to hold myself together, Erik set off to look for a kitten. He was convinced he wanted a kitten, while I was done with the obnoxious-hyper-defecating-behavior that kittens can often display. That is until we found Cesar sitting in his cage.
His description read, "a total lap cat"... "very clean"... doesn't make a sound"... and on and on with EXACTLY what I wanted to hear. He was really the exact opposite of Sheba. We fell in love with his demeanor and adopted him immediately, of course fighting of others who were jockeying for position to adopt him. I wasn't able to stay long to see who took Sheba home but I hope she found a home that she is content with.
Erik named him Cesar. I call him Cesar Salad. He is 10 weeks old and is very small and is very fragile. He doesn't make a sound. He tries to but we have reasoned he doesn't know how to meow yet. He makes the motions to and it is very endearing. This is common with kittens. Whenever I am on the couch he lays in my lap and sleeps until I need to move around, then returns when I am back again. At night he sleeps in between Erik and I at about knee level. I worry about one of us rolling onto him as we sleep since he can't make any noise! He has not had an accident and is very good about using his litter. In short he is the perfect cat... so far!
 |
| Caesar 2/11/08 2:20 PM |
While most people still believe that the entirety of the Middle East is shrouded in conservative religious fervor, Dubai is an undeniable contrast. This is reflected in every magazine, mall, billboard, and television commercial. Barely dressed mannequins peer out from lingerie shops in local mall windows, existing in close proximity to completely veiled Muslim women. This is the dichotomy that is Dubai.
Take this advertisement for example. Take a good look.
If you understand this advertisement you will realize why this cheeky ad shocked me. This ad was a supplement to the weekend edition of Gulf News, the regions most widely read English newspaper. It was the first page spread, giving it maximum exposure. I can't imagine that an ad like this would ever be placed in a major American newspaper supplement, as it would raise some moral issues. Other than in US "Men's Magazines", a.k.a. Maxim and the like, ads of this variety are few and far between.
Dubai's moral promiscuity baffles me.


I have a new kitten! Erik and I adopted her on Saturday from Feline Friends. They are a non-profit organization that operates with the help of volunteers. They are helping Dubai with the stray cat problem which is a big issue, so feline Friends says. A woman at Feline Friends said to me that one major reason Dubai has a stray cat problem is because pet stores breed pure-breeds to sell in their stores, while there are many other stray cats that need homes. Now, I don't think the pet stores would be breeding these pure-breeds if there weren't a demand for them. The people who buy those pure-breeds probably wouldn't want a "mutt" cat, whether there is a stray cat problem or not. So, that doesn't make a whole lot of sense to me. I'll get back to you on this one if I find out more.
Her name is Sheba. She is 8 months old. She is very inquisitive, and always getting into things and making us laugh. Erik likes to think that she is smart, and that's why she's so curious. I am hoping it's not the exact opposite. I mean, she did run across the living room into the solid side of a cardboard box... twice... in quick succession. She's very hyper, but she's a kitten still so it is expected. She purrs a lot and loves to have her belly rubbed. Someone at the shelter almost got her before I swooped in and called her my own. Now I'm happy she is here!


