Note from the author: While I have been researching HDR imaging for a while now, if you have any additions or corrections please don’t hesitate to email me or comment. Even though it feels like I’ve soaked in an incredible amount of information, I know there is always more to learn.
HDR (High Dynamic Range Imaging)
HDR photography is the utilization of several techniques in order to display a greater dynamic range of exposure (the range of values between light and dark) than is capable with a normal digital image. The intention of HDR photography is to accurately represent the wide range of intensity levels found in real scenes ranging from direct sunlight to shadows. The resulting image more accurately mimics the incredible ability of the human eye to see wide ranges of dark and light areas in a single scene.
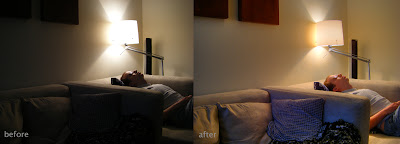
Here is the very first HDR I made with my little Fuji FinePix, proof that even the lowliest of cameras can benefit from this technique. The image on the left ("Before") is the image as would have been taken regularly. The image on the right ("After") is the HDR version of that image. Notice how you can see the detail within the lamp and in the foreground.
 |
___________________________________________________________________
Taking the Photo:
• Take pictures in RAW format.
• Set your ISO 400 or below to prevent noise.
• Use a sturdy tripod to prevent camera shake between pictures.
• Use a shutter-release cable or remote if you have one.
• Take at least 3 photos.
• Each exposure should be separated (bracketed) by one to two stops
• Only vary the shutter speed or exposure value (EV).
Exposure Bracketing Examples (using 7 photos):
Using varied EV: Take photos at -6EV, -4EV, -2EV, metered EV (master setting 0), +2EV, +4EV, and +6EV.
Using varied shutter speeds: Set your primary exposure (master setting 0). If the settings for picture 0 are (shutter speed) 1/125 and (f-stop) f/4.5, the settings for the remaining pictures are as follows:
• Picture +3: 1/250 f/4.5
• Picture +2: 1/200 f/4.5
• Picture +1: 1/160 f/4.5
• Picture 0: 1/125 f/4.5 (master setting 0)
• Picture -1: 1/100 f/4.5
• Picture -2: 1/80 f/4.5
• Picture -3: 1/60 f/4.5
Note: The darkest of these exposures should include no blown highlights in areas where you want to capture detail. The brightest exposure should show the darkest regions of the image with enough brightness that they are relatively noise-free and clearly visible.
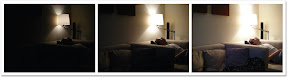
Here is a sample of what a line-up of 3 exposures for potential use as an HDR should look like. Take a look at the lamp and the foreground. See the how the lightest picture brings out the detail in the foreground while the darkest picture brings out the detail in the lamp. HDR imaging combines these details into one high dynamic range photo.
 |
___________________________________________________________________
Initial Editing (optional):
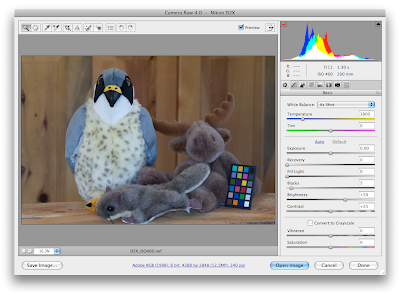
Select your range of exposed photos in Bridge (Adobe CS3) and drag all files to be used for the HDR image into the Photoshop icon in your dock (Mac). The Camera Raw box should appear. Using the dialog box:
• Make sure that all photos are the same color temperature and tint.
• Make sure that you turn off ALL the automatic check boxes.
• Adjust the color temperature to accurately portray real life temperature.
• Click “Done” and save.
Dialog box as seen in Photoshop CS3 on a Mac:
 |
___________________________________________________________________
Merging the Photos to an HDRi (High Dynamic Range Image):
Note: There are two options in this section. Choose one depending on your level of expertise, or mix and match to find the best option for your photo. You’ll find that your results can vary. One set of pictures might look best merged in Photoshop, while others might look best merged in Photomatix.
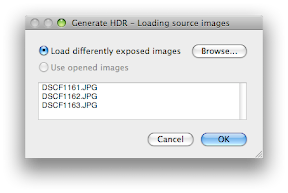
Using Photomatix to Merge:
• Choose: HDR> Generate.
• Choose your bracketed images.
• Click OK.
 |
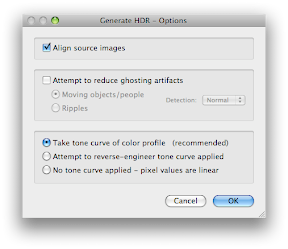
• Do not check the "Align Input Images" unless you think the images are not aligned (camera was bumped etc).
• Click OK.
 |
• HDR image appears.
• Save as tiff if you are moving onto Photoshop to edit and tonemap, otherwise keep the HDR file open in Photomatix.
Using Photoshop to Merge:
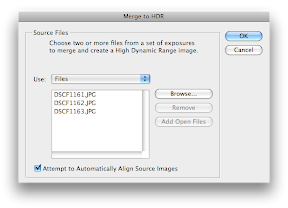
• Open Photoshop: Choose File> Automate> Merge to HDR
• Choose your photos (3 or more)
• Do not check the "Align automatically" box unless you think the images are not aligned (camera was bumped etc).
• Click Ok.
 |
• Image appears, click ok.
• Save as tiff if you are moving onto Photomatix, otherwise keep the HDR file open in Photoshop.
___________________________________________________________________
Tone Mapping the HDRi:
Note: This section of the tutorial contains two options. Choose one depending on your level of expertise, or mix and match to find the best option for your photo. Your success can vary from program to program. Use programs for tone mapping at your discretion.
Use care when violating the image’s original tonal hierarchy; do not expect deep shadows to become nearly as light as a bright sky. In an outdoor arch, the sunlit building and sky are the brightest objects while the inside of the arch remains in shadow, and they should stay that way in a final image. Overdoing editing during HDR conversion easily can cause the image to lose its sense of realism.
Tone Mapping in Photomatix:
• Merge images into an HDR using one of the two methods explained above.
• Have your HDR image open in Photomatix.
• Choose HDR> Tone map
• Move sliders until you have the results you are looking for.
• Save as tiff
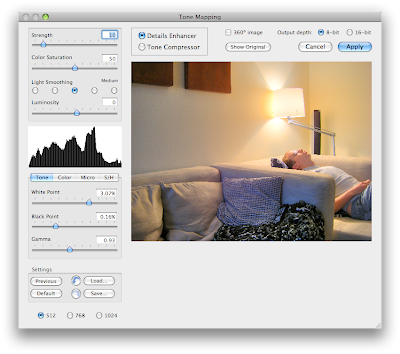 |
Note: You can make your photo look more or less illustrated at this point. Use your own judgment and style when it comes to this. If you find that Photomatix has left your photo with weird blackened and whitened areas, adjust the settings to lessen them then dodge and burn in Photoshop to fix these.
Tone Mapping in Photoshop:
• Open tiff
• Go to Image> Mode> 16 bits per channel.
• A box should appear, if you saved your tiff as 32 bit previously in Photomatix or Photoshop.
•Toggle Histogram arrow at bottom to show histogram.
 |
Work these menu items to your liking (HDR Conversion Menu):
Exposure and Gamma: This method lets you manually adjust the exposure and gamma, which serve as the equivalent to brightness and contrast adjustment, respectively.
Highlight Compression: This method has no options and applies a custom tonal curve, which greatly reduces highlight contrast in order to brighten and restore contrast in the rest of the image.
Equalize Histogram: This method attempts to redistribute the HDR histogram into the contrast range of a normal 16 or 8-bit image. This uses a custom tonal curve, which spreads out histogram peaks so that the histogram becomes more homogenous. It generally works best for image histograms, which have several relatively narrow peaks with no pixels in between.
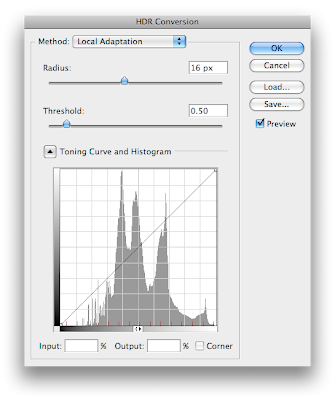
Local Adaptation: Unlike the other three methods, this one changes how much it brightens or darkens regions on a per-pixel basis (similar to local contrast enhancement). This has the effect of tricking the eye into thinking that the image has more contrast, which is often critical in contrast-deprived HDR images. This method also allows changing the tonal curve to better suit the image. The main problem with the local adaptation method is that it cannot distinguish between incident and reflected light. As a result, it may unnecessarily darken naturally white textures and brighten darker ones. Be aware of this when choosing the radius and threshold settings so that this effect can be minimized.
Note: A good place to start your tone mapping is in the Local Adaptation menu. Go into menu at top and select "Local Adaptation". Move the black point slider to the leftmost edge of the histogram peaks in order to see all the shadow detail. Move the white point slider to the rightmost edge of the histogram peaks in order to see all highlight detail.
• Image> Adjustments (adjust settings, use your judgment)
• Tone, Filter and adjust to your liking.
• To remove unwanted objects, use healing brush.
• Stamp tool> Stamp out oversaturated pixels and halos, which happen often in HDR imaging.
• Make sure to save a tiff version to preserve quality.
_____________________________________________________________
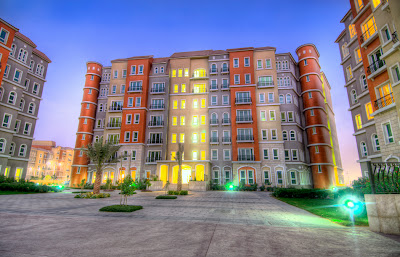
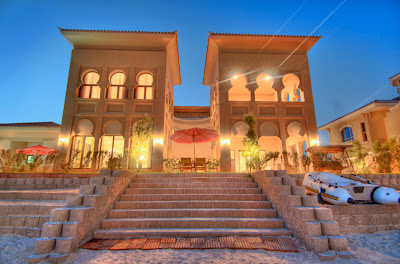
HDR in Action:
During my career as a graphic designer at Better Homes I have introduced the photography team to HDR imaging. So far these are the results we have achieved. While our knowledge is still in it's infancy I feel that we are off to a really great start. Here are some images that were a team effort. The photography team took the exposures, and I tone mapped and edited the photos.
 |
 |
 |
Here are some very useful links for discovering more about HDR:
HDR Tutorials Roundup
Backing Winds: How to create professional HDR images
Before the Coffee: Bracketing and number of images
Cambridge in Color: Digital Photography Tutorials
How to take HDR Photos: Tips and Tricks
Lou Haskell: HDR Imaging
Memoirs on a Rainy Day: Modern HDR Photography
Earthbound Light: Photoshop HDR
Photoshop Cafe: HDR Tutorial
Cybergrain: The Future of Digital Imaging
Here are some great sites to look for HDR inspiration:
Smashing Magazine: 35 Fantastic HDR Pictures
Flicker: HDR Group
Cambridge HDR Photos
Before the Coffee
Digital Picture Zone: 25 Truly Stunning HDR Photos
Abduzeedo: 20 Beautiful HDR Pictures
Web Ecoist: 25 HDR Nature and Landscape photos


